
Ultimate Guide to Preventing Trim Rot
Prevent trim rot in Seattle's damp climate with the right materials, proper installation techniques, and a maintenance routine that works.
By Seattle Trim Repair · Published · Updated
Trim rot is one of the most common and costly exterior problems Seattle homeowners face. Steady rain, high humidity, and thin sunlight make ideal conditions for fungal decay in wood. Ignore it and the rot moves from the surface into the structure, which means bigger bills and, often, pests. The good news: trim rot is largely preventable. It comes down to smart material choices, careful installation, and steady maintenance, and this guide walks through all three.
Prevention starts with knowing what feeds the rot. The fungus Serpula lacrymans needs three things at once: wood moisture content — the percentage of water held in the fibers — above 20 percent, temperatures between 59°F and 71.6°F, and still air. Seattle hands it all three for much of the year. We average 156 rainy days, and it rarely gets cold enough here to stop the fungus. Today’s lumber grows fast, so it is less dense and rots easier than the old-growth wood in century-old homes. Once rot takes hold it spreads hard, through wood and even into masonry, and the problem compounds.
Why Seattle Homes Face Higher Trim Rot Risk
Seattle’s weather is built for wood decay. With 156 rainy days a year dropping about 39 inches of rain, moisture never lets up on exterior trim. Humidity keeps the wood damp between storms, so it never gets the dry spells that protect trim in a desert. Unlike places with hard winters, our mild climate lets decay run year-round; it never freezes long enough to stop.
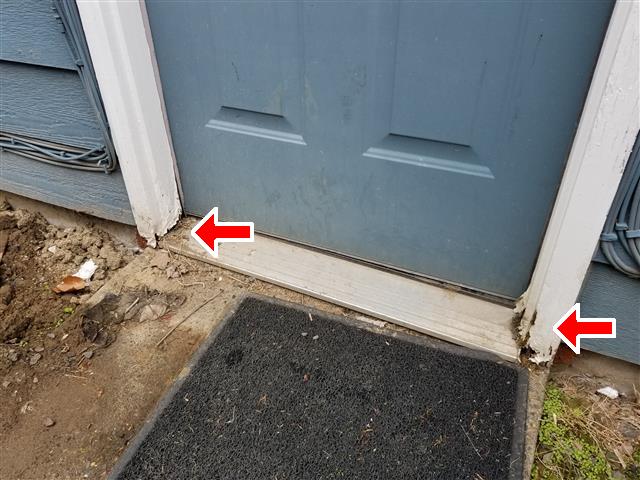
Bad drainage makes it worse. When gutters clog or a downspout dumps water next to the house, it soaks the weak points: fascia boards along the roof edge, window sills, door thresholds. Poor sealing at the joints lets water slip behind the paint and sit against bare wood, exactly where fungus wants it. Untreated or cheap wood has little defense of its own, and a rushed install — skipped flashing, unsealed end grains, the wrong fasteners — opens gaps that get worse with every storm.
The result is a maintenance problem that belongs to the Pacific Northwest. Homes here need more care because the moisture never quits. Regular inspections, better materials, and thorough sealing are not nice-to-haves; they are what keep a small fix from becoming an expensive one.
Choosing Durable, Rot-Resistant Trim Materials
Material is your first line of defense. In this climate, the right trim can mean decades of quiet performance instead of one costly replacement after another.
Pressure-treated wood is the cheapest option at $0.50 to $3.00 per linear foot: the chemicals fight rot and insects, but it still needs repainting every 3 to 5 years and regular checks for decay, which is the lowest price and the highest upkeep.
Cedar brings natural beauty and toughness at $2.00 to $6.00 per linear foot. Its oils slow moisture, so with care it lasts for decades, but the catch is upkeep: seal and repaint it every 5 to 7 years, because leave cedar unsealed here and it will rot, oils or not.
Fiber cement is our top pick for a wet climate like Seattle, at $3.00 to $8.00 per linear foot. Boards like James Hardie® shed water and weather beautifully, and fiber cement also takes paint well, even the dark shades that warp some other materials, which makes it hard to beat on a high-moisture wall.
PVC trim is all plastic, so it is flat-out rot-proof, at $2.00 to $5.00 per linear foot, and it cuts with normal tools. It does move a lot with temperature, though, so it needs the right install and lighter paint colors to avoid heat trouble.
Composite materials blend plastic and wood fiber for a middle ground, at $4.00 to $7.00 per linear foot, and they resist rot and moisture, take paint well, and ask less of you than natural wood.
Today’s lumber is less dense than the old-growth in homes built before 1950, so it rots faster. In a climate this wet, we tell people plainly: paying more for rot-resistant material up front is the cheaper choice over time, in maintenance skipped and replacements delayed.
Installation Techniques That Prevent Moisture Intrusion
Even the best material fails if it goes on wrong. The goal is layers of protection, so no single slip lets water in.
Flashing is critical. Flashing is the metal that keeps water out of a seam, and you set it above and behind the trim, past the edge of the wood, so water drips off instead of running back at the wall. Metal outlasts caulk by years; caulk shrinks and pulls away. If a contractor’s rot plan is mostly caulk, that is a warning sign, because caulk is a gasket, not a roof. Kickout flashing — the small diverter where a roof meets a wall — is the piece most often missing, and it is the one that keeps roof runoff off the fascia.
Drip edges push water away from the surfaces that soak it up: these little lips at windows, doors, and horizontal trim send water outward instead of back against the wall.
End grain sealing is not optional, because the cut end of a board soaks up water fastest of all. Seal every cut end with a good exterior primer or paint before it goes up, and you block that path.
Proper clearance stops wicking. Keep trim up off the ground and out of direct contact with masonry or concrete, which pull moisture into the wood, and use corrosion-resistant fasteners, stainless steel or galvanized screws, so you avoid rust stains and weak spots.
Install it that way — fiber cement with every surface primed and painted, metal flashing behind the trim, and polyurethane caulk at the joints — and it is common to open that same trim for a routine inspection five years later and find no moisture at all. Behind the siding, a weather-resistant barrier (WRB), the water-shedding wrap under the cladding, plus a rainscreen gap, the vented air space that lets leftover moisture drain and dry, keep water off the sheathing. Good installation is what turns that from luck into the expected result.
Sealing and Finishing for Maximum Protection
Sealant backs up the rest of your moisture defense. Use an exterior-grade caulk — polyurethane, silicone, or a good acrylic latex — at the joints, seams, and gaps, because these flex with the temperature and resist cracking far better than the cheap stuff.
Prep first: clean the surface, strip the old caulk completely, and sand it smooth so the new bead grips. Lay caulk in one continuous line and tool it right away so it sticks to both sides, then smooth it into a slight concave shape; that sheds water best.
For paint, use 100 percent acrylic exterior, which stays flexible and fights both moisture and UV. Put on at least two coats and cover everything, edges and end grains included. On synthetics like PVC, skip dark colors; they soak up heat and make the trim expand.
Keep to a schedule. Check caulk and paint every year for cracks, peeling, or shrinkage, treat any exposed wood right away, and re-caulk every three to five years, sooner if it needs it. In our rain and humidity, that habit is what stops small problems from turning expensive.
Essential Maintenance to Prevent Trim Rot
Moisture is behind up to 90 percent of exterior wood trim failures nationwide. Steady maintenance can cut your rot risk by more than 50 percent against a house that gets none.
Annual inspections are your main defense. Walk the trim after a heavy rain or storm, when problems show best, and look where water gathers: at gutters and downspouts, window and door sills, corners and seams, and anywhere trim meets another material. Warning signs are wood that feels soft or spongy, dark streaks, visible mold, and pest damage from termites or carpenter ants.
Probe any suspect spot with a screwdriver. Sound wood feels solid; rot crumbles or gives, so write down what you find so you can watch it over time and fix the worst first.
Essential maintenance tasks protect your investment:
Clean gutters and downspouts at least twice a year, more if trees hang over the house, because that stops the overflow that soaks trim. Make sure each downspout carries water at least 3 to 4 feet from the foundation.
Cut back plants so shrubs, trees, and vines stay 12 to 18 inches off the house, since air moving across the wall keeps it drier, and dry wood does not rot.
Repaint and re-caulk every 3 to 5 years. Scrape the peeling paint, prime any bare wood, and lay down a good exterior coat, then re-caulk around windows, doors, and trim joints to shut water out.
Keep the ground sloping away from the house so water runs off, not toward it, and use splash blocks or drain pipes to carry it clear of the foundation.
Trim rot repair usually runs $300 to $1,200 per affected area. Catch it early and stick to a schedule, and you keep most jobs in that range. Find widespread rot, though, and it is time to call people who work Seattle moisture for a living.
Identifying and Addressing Early Signs of Rot
Catching rot early saves real money and grief. Dry rot gets going once wood moisture content passes 20 percent, so knowing the early signs protects the whole house.
On your yearly walk, look for discoloration: dark patches, yellow streaks, or off colors where water has pooled or soaked in, then test firmness with a finger or screwdriver. Sound wood pushes back; rot feels soft, spongy, or crumbles.
Peeling paint is a signal, not just an eyesore, because it means moisture got past the coating, which sets up rot underneath. Mold shows as fuzzy patches, white, green, black, or brown, usually with a musty smell that says the wood is wet.
Warping, buckling, or new gaps mean the wood is starting to fail, and small pest holes usually point to damp, weakened wood that drew the insects in.
Spend your time on the high-risk spots: window and door frames, corners, fascia and soffits (the underside of the roof overhang), and anything near gutters or downspouts. In our climate those places stay wet, so they rot first. A quick monthly look at them catches trouble before it turns into a big job.
DIY Repairs vs. Professional Help
For small, local damage, a DIY fix can be enough. If the rot lifts out easily with a screwdriver and the wood around it is solid, you are dealing with surface damage. Dig out all the soft wood and let the spot dry fully. Brush on wood hardener, then rebuild with epoxy wood filler; marine epoxy makes the toughest, most weather-resistant patch. Once it cures, sand, prime, and paint. Materials for a DIY fix usually run $20 to $100.
Call a pro when the damage is widespread or structural. That looks like deep softness over a large area, heavy warping or crumbling wood, rot that has reached the framing, or the same spot failing again after a past repair. That last one matters: if you have patched a spot twice, filler is not the answer, because the water is still getting in and the board needs to come out. Professional trim repair in Seattle runs $250 to $1,000 or more per area, depending on scope and material.
Putting off even a small repair costs you later. Rot spreads fast in our damp air, bringing more structural damage, higher bills, pests, mold, and drafts. If you keep fighting the same rot, or the damage is serious, bring in a contractor who does exterior work here and knows how this climate behaves.
Long-Term Protection Strategy
Seattle’s 156 rainy days a year are a real test, so keeping an exterior in good shape takes all three: smart materials, careful installation, and steady maintenance. PVC, fiber cement, and pressure-treated lumber cost more at the start, but they cut how often you repair, and that is the better value over time.
Good installation is the barrier that keeps water out. Solid sealing and careful workmanship keep moisture off the wood that would soak it up, and without that layer, even the best material fails in the end.
Steady maintenance is your first defense. Small habits — a look after heavy rain, clean gutters, fresh paint and caulk — add up, and catching a problem early cuts the repair cost by as much as 50 percent against letting it advance. That is the whole game with trim rot.
For help with trim repair, dry rot prevention, or siding work built for Seattle’s climate, call (425) 517-1751 and book a free 15-point inspection.
Not sure how bad yours is?
Send a photo or describe the spot over the phone. We will tell you whether it is a patch, a section, or something structural before anyone comes out.
Mon–Fri, 7:00am – 5:00pm
Questions homeowners ask us about this
What are the best materials to use for exterior trim to prevent rot in Seattle?
What are the early signs of trim rot, and how should I deal with it?
What maintenance routine prevents exterior trim rot over time?
How much does it cost to repair trim rot in Seattle?
Read next
- Dry Rot
What Causes Dry Rot in Pacific Northwest Homes?
Understand what causes dry rot in Seattle homes, from persistent rain to poor ventilation, and how to prevent structural damage with proven strategies.
- Trim Repair
Top Materials for Durable Exterior Trim Installation
Compare fiber cement, PVC, fiberglass, and aluminum trim for Seattle homes. Learn which materials resist moisture, last longest, and require the least maintenance.
- Dry Rot
5 Steps to Treat Dry Rot in Wood
Fix dry rot permanently with this proven five-step method: stop moisture, remove rotted wood, apply fungicide, harden with epoxy, then finish.
Get a straight answer on your siding, trim, or rot
Free estimate, no obligation, and usually a slot the same week. We cover Seattle, Bellevue, Redmond, Kirkland, Bothell, and Tacoma.
Mon–Fri, 7:00am – 5:00pm · Free estimates · Same-week scheduling